
Updated:
Readtime: 8 min
Every product is carefully selected by our editors and experts. If you buy from a link, we may earn a commission. Learn more. For more information on how we test products, click here.
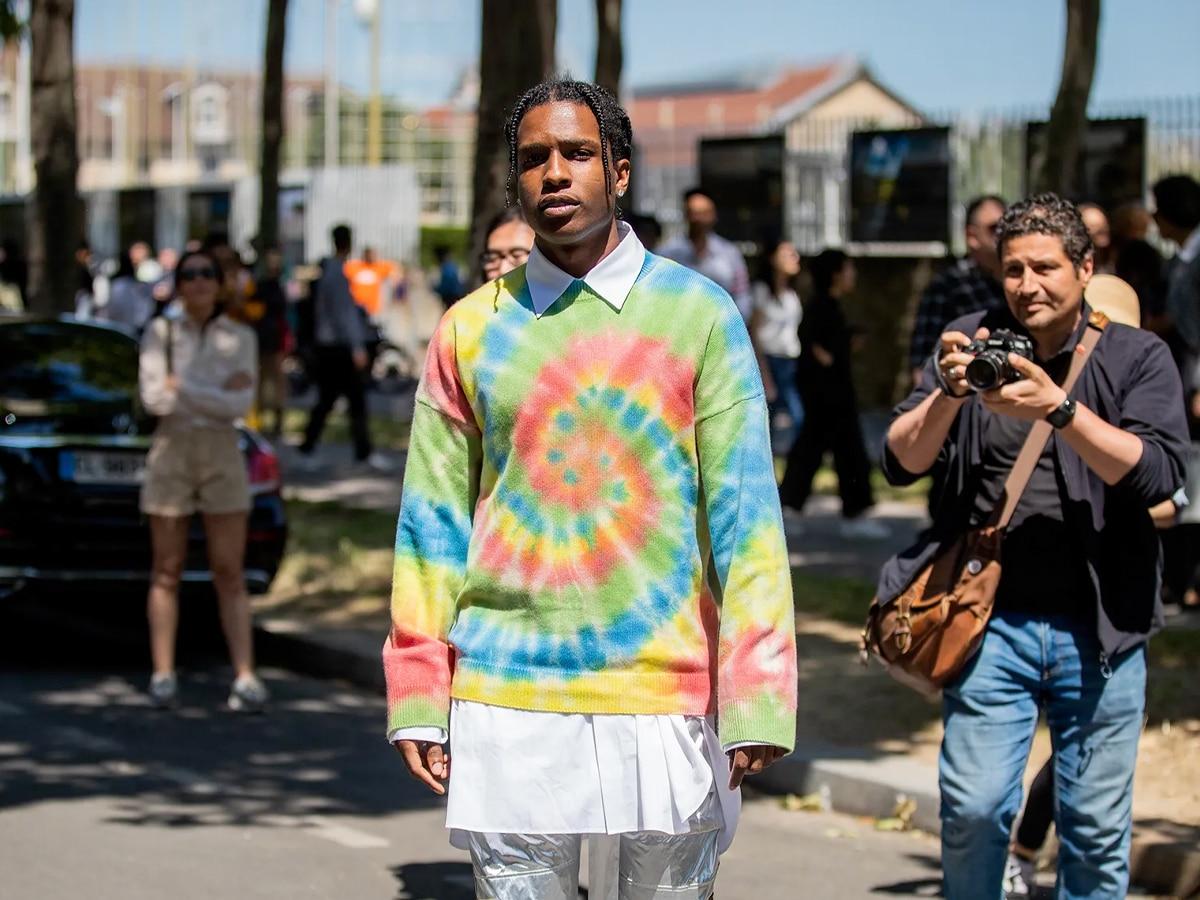
Ever wondered how to tie dye clothing? Considering every band shirt and pop-culture fashion piece is now covered in swirls and circles, it’s about time you upped your fashion game and figured it out. Some of the trendiest male celebs out there are sporting tie dye (or tie-die, depending on your country of origin) shirts, pants and accessories- and we’re here for it. Once Travis Scott started rocking the tie dye, it started to pop up everywhere- so it’s no secret a lot of us want to look just like the man himself. Here’s everything you need to know about tie dye and how to do it so you can be looking the part.
You’ll also like:
Style Guide: How to Dress Like Travis Scott
Style Guide: How to Dress Like Shia LaBeouf

What is Tie Dye?
Tie dye is a method of dying using your hands where you tie various small sections of a clothing item with a string, and then immerse it in a tub full of water and dye. The end result is unique coloured patterns on the fabric. It creates this effect as the dye fails to reach the tied sections, creating irregular circles, dots and stripes. You can choose whatever colour dye you like and you can immerse any clothing item you like, or sheet, tea towel- anything!
The Tie Dye Resurgence
Tie dye using the hand method was originally most common in India and Indonesia. It has since been adapted to machines and has become more widespread in western culture, pop culture and more recently, has made a resurgence as a popular fashion trend. When you first think of tie dye your mind most likely wanders to the hippie days of the 1960s and 1970s, a time when tie dye was hugely popular amongst hippie folk. There are a few reasons for its comeback.
The first is current trends towards sustainable fashion which prioritise re-styling clothing items we already have, for example, an old yellowed t-shirt that could be turned new again. Another element impacting its resurgence is the rise of at-home-creativity during COVID- tie dye is a hands-on, fun thing to do at home. As well as this, big brands have started selling more modern tie dye patterns in their latest collections. So, it’s no secret that tie-dye is back baby!

Tie Dye Techniques
If you’re new to tie dye then it’s good to start with the basics so you can nail the look. Tie dye is pretty versatile and there are two main ways you can do it. Neither way is right or wrong, it just depends on what look you’re going for and how you want to achieve it.
Wet Method
Damp or wet clothes are best if you’re looking for the easiest way to tie dye. When the fabric is damp, it’s easy to fold and mould into shape and it dyes nicely. The water that is already in the fabric helps the dye penetrate the fibres and improves the spread of the dye solution. The final product is smooth, consistent dye colours. However, because the clothing is already wet, it can only hold so much liquid, meaning that the dye will only be on the surface rather than deeply penetrated within the fabric.
Dry Method
Whilst dying a dry clothing item is the more challenging option, the extra benefits make it worth the struggle. The lack of dampness in the clothing means that the fibres are free to move around when you try to shape and compress them. As well as this, the dye droplets can be stopped altogether, which isn’t ideal. Because dry clothing is hard to fold and keep in place, a solution is folding a damp shirt and then leaving it to dry before dying it. However, ensuring the dye penetrates the dry shirt remains a challenge.
You could spray the shirt with mist from a spray bottle or place the nozzle of the dye directly onto the shirt, so it’s guaranteed to pass through the surface. Why go to all the hassle? Dry clothing absorbs dye differently from a damp shirt. The dye spreads less on a dry shirt, meaning the colours and choice of patterns and spacing can be more controlled.

How to Tie Dye Shirts and Hoodies
Now that tie dye is all the rage, as is DYI, it’s important to know how to tie dye your shirts and hoodies so you can transform your wardrobe and keep up to date with the latest trends. There are a few different methods of achieving the best finished product, but whichever way you choose to go, the most essential part is that you’re having fun while you’re doing it. Cheap, sustainable and fun- this is how to tie dye your shirts and hoodies.
Tools You’re Going to Need
- Shirt or hoodie
- Dye
- Rubber bands
- Rubber gloves
- Squeeze bottles
- Urea and soda ash
- Large ziplock bags
- Tub
- Wooden dowel
- A funnel
- Measuring cup
- Paper towels
- Paper plates
Instructions
1. Find a Shirt that Fits
This is the easiest step- just make sure the shirt is a natural fabric like cotton (100% cotton works best) or silk or rayon.
2. Choose You Tie Dye Colours
Buying a dye kit is the best option here- as they include other tools you’ll need for the process. All you have to do is choose which colours you like best. The better dyes are the Procion dyes.
3. Grab the Tools You Need
Either find a sufficient pre-packaged kit or grab all the tools from around the house that you may need. Dyeing does tend to get messy- so be prepared!
4. Soak the Shirt
To ensure that the dye sinks into the shirt, you will need to soak it in a solution of warm water and soda ash with a bit of salt for roughly ten minutes. After the shirt has been soaking for a while, pop on your gloves and wring it out remembering that the more liquid you squeeze out, the more dye will absorb. One way to do this is by putting the shirt in the washing machine on a spin cycle.
5. Shape it into Desired Pattern
Here comes the fun part! Lie the shirt on a flat surface, placing it right side down so that you get a sharper pattern on the front of the shirt. Place the dowel rod in the middle of the shirt and start turning it clockwise until you have a flat pie shape.
6. Make Sure it’s Symmetrical
This is a very important step in the process. Don’t allow the shirt to creep up the dowel rod and make sure it is evenly distributed around the circumference of the rod. When you’re sure it’s centre- remove the dowel.
7. Add Rubber Bands
Add the rubber bands by wrapping them around the bunched-up shirt. Put on quite a few rubber bands and then turn the shirt over and add some more, creating a criss-cross star pattern.
8. Start Dying
Cover the working surface so the dye doesn’t get all over the place and wear rubber gloves while you do this step. Place the shirt on some paper towels or paper plates and squirt various dye colours onto different sections of the shirt.
9. Turn the Shirt Over
When you have finished putting dye on the first side, turn the whole shirt over and apply the dye on the second side in a similar manner.
10. Allow Die to Prove
Once the dying is complete, pop the shirt into a ziplock bag and seal it up tightly. Place the bag somewhere warm and leave it for at least 24 hours. We know this is a long wait and you’re excited to see your cool new shirt, but this is how long the dye needs to properly soak into the fibres of the fabric.
11. Unwrap Your Creation
Ah, the moment we have all been waiting for- the grand reveal! Take the shirt out of the bag, take the bands off and place the shirt under some running cold water. Plenty of dye will run out, but this is normal, and enough dye will remain, so keep rinsing until the water runs clear. Then, wring your shirt out and viola- your new, trendy tie dye shirt!
General FAQs
You will need the dye, rubber bands, gloves, soda ash, ziplock bag, tub, dowel, funnel, measuring cup and paper towels.
Both methods have their own unique appearance, but the wet method is the easier method.
Tie dye is fine to wash normally, but for the first wash- put it in the machine on it’s own.
Food colouring can be used to die dye a shirt, but instead of using soda ash when first soaking the shirt, use vinegar.


Comments
We love hearing from you. or to leave a comment.